Learner's creations

Wednesday, April 26, 2006

White Chocolate Cappucino Muffin with Cream Cheese Topping


I was suddenly in the mood to bake something. Looking at my list of things to try, I thought why not make muffins, since I've not tried it before. I've seen loads of bakings on this, but there was never an occasion to try it. Now I thought....it's a good time to try! Hehehee...!!

I went ahead to bake the White Chocolate Cappucino muffin since I've all the ingredients available. I wanted to try this cause I love any type of bakings with coffee and this recipe also asked for Baileys....!


I found the recipe on the internet at Rachael's website.

White Chocolate Cappucino Muffin
Ingredients for muffin:
1 1/2 cups plain flour
1/2 cup caster sugar
1/2 tsp salt
2 tsp baking powder
1/2 cup white chocolate chip
1/4 cup sunflower oil
1 egg
2 tbsp Baileys
2 tsp instant coffee in 1 tbsp water
1/3 cup milk

Methods:
1. Mix the flour, sugar, salt, baking powder and chocolate chips together.
2. In a separate bowl, mix the oil, egg, Baileys, coffee mixture and milk.
3. Add the liquid mixture into the flour mixture.
4. Mix until combined but do not overmix. It is alright to have lumps in the batter.
5. Bake in the preheated oven at 190C for 10minutes. Meanwhile, prepare the cream cheese topping.

Ingredients for cream cheese topping:
125g cream cheese
1 tsp vanilla essence
60g icing sugar
1 medium egg

Methods:
6. Beat the all the cream cheese topping together until fluffy and well combined.
7. When the 10minutes are up, carefully spoon the cream cheese over the muffins.
8. Return to bake for another 15minutes.

Stir Fry Chilli Aubergine


This is dinner for tonight, stir fry chilli aubergine. In Malaysia aubergine is better known as brinjal or eggplant, and is usually used to cook curry.

It's been a quite a while since I last had aubergine and I thought I'd cook something spicy using my Lee Kum Kee Chilli Bean Sauce. Alas! Only after I started cooking did I realise that I had very little left. I mixed it with water and give the jar a good shake to make good use of every single bit that's left. Luckily it was just enough to make the dish has a hint of spiciness.


Stir Fry Chilli Aubergine
Ingredients:
1 medium sized aubergine, cubed
100g minced pork
3 cloves garlic, chopped
1 stalk spring onion, cut into 1" length
1 tbsp Lee Kum Kee Chilli Bean Sauce (Toban Djan)

Methods:
1. In a non-stick pan, dry fry the minced pork until brown.
2. Add in the chopped garlic. Then, add in the chilli bean sauce and keep frying.
3. When it is fragrant, add in the aubergine and water.
4. Cover and let the aubergine simmer until tender and soft. Keep adding water if it's not enough, as aubergine tends to absorb a lot of water.
5. Add the spring onion and stir fry for another minute.
6. Serve hot.

Monday, April 24, 2006

ABC Soup


Like most Chinese, I love home cook soup. As my whole family love to drink soup, we will usually have them a when my mom cooks at home. I love all types of Chinese soup, from vegetable based ones to those herbal types.

The ABC soup is my all time favourite soup!! When I was at home, I will keep asking my mom to cook this soup for dinner. When I arrived here, this is the soup that I cooked most. It is easy to cook and the ingredients are cheap and are easily available in the supermarket.


ABC Soup
Ingredients:
5 chicken wings
2 medium sized potatoes
2 carrots
2 onions
3 tomatoes
Pinch of salt

Methods:
1. Clean and cut the chicken wings in two.
2. Peel the potatoes and carrots and cut them into chunks.
3. Peel the onions and cut into eighths.
4. Quater the tomatoes.
5. Put all the ingredients into a pan and add water to fill the pan. When the water boils, turn down the heat and let the soup simmer for 1.5 hours.
6. Add in a pinch of salt, to taste.
7. Serve hot.

Soy Sauce Steam Salmon & Stir Fry Broccoli


My dinner for Monday, soy sauce steam salmon and stir fry broccoli. I've reserved some of the leftover for today's lunch. I love broccoli and carrot. I always have them in my fridge as I find them very versatile. They are not very expensive here in the UK.


Soy Sauce Steam Salmon
Ingredients:
1 piece salmon fillet
4 Chinese mushrooms, soaked and thinly sliced
5 tbsp water
1 1/2 tbsp soy sauce
1 tbsp fish sauce
1/2 tbsp sesame oil
3 cloves garlic, chopped
4cm ginger, cut into strips

Methods:
1. Clean the salmon fillet and put in a plate.
2. Sprinkle the Chinese mushrooms, garlic and ginger on the salmon.
3. Mix together water, soy sauce, fish sauce and sesame oil. Pour onto the fish.
4. Steam the fish for 8 minutes. The time depends on the thickness of the fish.


Stir Fry Broccoli
Ingredients:
150g broccoli
50g sliced pork
1 carrot
1 yellow onion
A handful of dried shrimp, minced
5 Chinese mushrooms, soaked and sliced
3 cloves garlic, chopped
1 tbsp olive oil
1 tbsp oyster sauce
Dash of white pepper

Methods:
1. Heat a wok with olive oil.
2. Saute the minced dried shrimp and garlic.
3. Fry the sliced pork. Add the oyster sauce and a dash of pepper.
4. Add in the mushroom and onion, and fry for a minute.
5. Put in the carrot and broccoli. Add some water (I used the mushroom water). Stir fry till soft.
6. Add more oyster sauce or salt to taste. Serve hot.

Long Beans Omelette


This is something that I've cooked for Friday's dinner.


Long Beans Omelette
Ingredients:
150g green beans, chopped into small pieces
3 eggs
Dash of light soy sauce
Dash of white pepper
Oil for frying
Salt, to taste
Sugar, to taste (optional)

Methods:
1. Heat oil in a flat frying pan.
2. Put in the green beans and stir fry until soft. Add in a pinch of salt.
3. Beat the eggs and add in a dash of soy sauce and white pepper. If you are using sugar, put in some sugar.
4. Pour the egg over the green beans.
5. Cook on a low heat until lightly browned.
6. Flip the egg and cook the other side till browned.
7. Serve.


Besides the omelette for dinner, my boyfriend cooked another 2 dishes - stir fry broccoli and tamarind fish.


Sunday, April 23, 2006

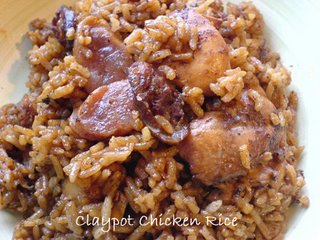
Stewed Pork (Tau Yew Bak) with Eggs & 'Claypot Chicken Rice' using Rice Cooker


I'm still trying to catch up with the food that I've cooked before in the past week. I've made Stewed Pork (Tau Yew Bak) with Eggs and also 'Claypot Chicken Rice', but using the rice cooker!

The tau yew bak can be eaten with rice, or with noodles. I can remember my granny cooking this when I was young, they are delicious and I don't get bored eating them. Now, I realise it's rather hard to master this dish. This is my 2nd try, and yet the flavour is still not right. This time, the dish tasted of too much 5-spice powder.

I cooked the claypot chicken rice the other day as I was keen to have something easy to cook. I love this, as it's really delicious and have lap cheong in it! I love lap cheong.....


Tau Yew Bak with Eggs

Ingredients:
500g pork shoulder, cubed
3 tbsp dark soy sauce
3 tbsp dark brown sugar
5-spice powder
Hard-boiled eggs, peeled
Garlic cloves, smashed
Salt, to taste
Water

Methods:
1. Heat sugar and 1/4 cup of water over medium heat. Stir well until the sugar is melted.
2. Add the soy sauce, 5-spice powder, garlic and some salt. Add in the remaining water.
3. Put in the pork and let it braise for 15mins.
4. Add in the eggs.
5. Make sure that there is enough water in the pot to cover the eggs and the pork.
6. Bring to a boil, and then let simmer over low heat for at least 30mins, or until the pork is tender.
7. Serve.


Claypot Chicken Rice
Ingredients:
2 cups raw rice, washed and drained
2 chicken legs, deboned and cubed
2 Chinese sausages, sliced
2 tbsp fish sauce
1 tbsp sesame oil
3 tbsp dark soy sauce
1/2 tbsp oil

Methods:
1. Wash the rice and cover with enough water as you normally would.
2. Add in the chicken and the Chinese sausages.
3. Add in the seasonings. Stir to mix evenly.
4. Put the rice in the rice cooker to cook.
5. Serve

Notes:
1. You can add in salted fish if you prefer.
2. You can garnish this dish with spring onion and toasted shallots.

Mua Chee


This is one of the snacks that I love when I was back in Penang. Mua Chee is not as common anymore, but there's definitely one in Gurney Drive which is quite tasty, but a bit more expensive.

I saw this recipe while browsing Kitchen Capers. It is a simple and quick, that I can't resist trying it.


Mua Chee
Ingredients:
250g glutinous rice flour
375ml water
2 tbsp oil
250g peanuts
50g castor sugar

Methods:
1. Roast the peanuts, without oil, on low fire until fragrant. Becareful, peanuts can get burnt rather easily. An alternative will be to roast the peanuts in the oven.
2. Remove skin. Grind the peanuts till fine.
3. Add castor sugar to the peanuts and mix well.
4. Mix flour, water and oil. Stir until smooth, the mixture will be like a batter mix.
5. Pour into a Pyrex bowl and microwave on high for 7 minutes.
6. Cut a portion of the mua chee and put in the peanuts mixture. Cut into small pieces using a kitchen scissors. Toss the mua chee in the mixture and coat well.
7. Serve immediately.


Because of the chopper that I'm using, I couldn't grind the peanuts any finer. The mua chee is really good....all of us said that it tasted exactly like those back home. Yummy....!!!

Thursday, April 20, 2006

Rubies in Coconut Milk (Tub-Tim Grob)


This is a Thai dessert that my boyfriend likes. Tub-tim literally means ruby, and tub-tim grob means crunchy ruby.

He tried this before in Malaysia, and every time we are in a Thai restaurant here in UK, he will surely asks if they serve this. Personally, I haven't tasted this dessert before, and was just depending on him to tell me how close I am to the real thing. He said what I have made this time is pretty close....so it wasn't too bad a try, was it? I quite like this dessert, so I will definitely try the real thing next time!


Rubies in Coconut Milk
Ingredients:
1 can of water chestnut, you can use fresh ones if possible
A few drops of red food colouring
Some tapioca flour
1 can of sea coconut
1 can of coconut milk

Methods:
1. Cubed the water chestnuts into small pieces, about 6-8 cuts per water chestnuts. Use fresh water chestnuts if you like, but the ones in the can are already peeled and ready to use.
2. Dry the water chestnuts. Put the pieces in a bowl and put in a few drops of red food colouring. You can use beet juice from boiled beets if you prefer to use natural food colouring.
3. Add in tapioca flour and coat well. Scoop the water chestnuts into a strainer to get rid of excess flour. Sprinkle some water on the water chestnut and put coat them with flour again. If you want bigger rubies, repeat this a few times.
4. Boil a pan of water. Drop in the rubies one at a time into the water to avoid them sticking together. Cooked rubies will float on the water. Scoop them up in a strainer and cool them in ice water.
5. To serve, put some sea coconut and rubies in a cup. Add some sea coconut syrup into the cup, the amount depending on the sweetness you like. Top it up with coconut milk. Add a teaspoonful of rubies on top just before serving. You can add in some ice too.

Note:
You can make your own syrup if you choose not to put in the sea coconut. Make the syrup by boiling some water with sugar and pandan leaves.

Wednesday, April 19, 2006

Oreo Cheesecake


Another birthday, another baking session. It's Ray's birthday during the Easter weekend. He's from London, and was up visiting us during this holiday season. I decided to surprise him with a birthday cake. I decided to make him my Oreo cheesecake, which is easy to make and it does taste yummy!


Oreo Cheesecake
Ingredients:
250g ginger nut cookies
50g butter, melted
500g cream cheese, softened
100g castor sugar
250ml whipping cream
24 Oreo cookies

Methods:
1. Crush the ginger nut cookies, and mix with the melted butter. Press the mixture in an 8inch square baking tin and put in the freezer.
2. Beat the cream cheese. When it is soft, add in the sugar.
3. When the mixture is fully combined, slowly beat in the whipping cream. The mixture will be soft and smooth.
4. Roughly chop 18 of the Oreo cookies and fold into the cheese mixture.
5. Place in the pan on top of the crust and refrigerate for around 4 hours.
6. Crush the remaining Oreo cookies. Spread on top of the cheesecake before serving.

Easter Eggs


Oh no.....I haven't been blogging for over a week, and I've got so many back dated post to put on. First is the Easter Egg that I've made for Easter. It was quite a late decision from me and my boyfriend. Both of us were in the kitchen until late at night...but the result was pretty satisfying.

Easter have many customs and legends, some of which are of pagan origin and some of which are of Christian believes. Traditions associated with Easter includes Easter rabbit and Easter egg.

The ancient Saxons celebrated the return of spring with a festival, Eastre. The name comes from the word "Ostra" and "Ostern" or "Eastre", both Goddesses of mytholoy signifying spring and fertility. When the Christian missionaries encountered these tribes, they attempted to convert them to Christianity. Coincidentally, the pagan festival of Eastre occured at the same time as the Christian observance of Resurrection of Christ, this celebration is slowly altered. The name is eventually changed to its modern spelling, Easter.

Easter is the time for the Christians to celebrate the resurrection of Jesus Christ, and is celebrated with greatest joy. Jesus Christ was crucified on Good Friday, where his body was then taken buried in a cave. The tomb was guarded with an enormous stone at the entrance, but was missing on the following Sunday. Jesus himself was then seen that day, and for days afterwards by many people.

Easter Bunny originates from the pagan festival. The earthly symbol of the goddess Eastre is the rabbit. The Easter egg is also also a symbol of Easter, symbolising rebirth and fertility.


Homemade Chocolate Easter Eggs
Ingredients:
150g milk chocolate
approximately 20 hazelnuts

Methods:
1. Melt the milk chocolate using a double boiler, or like me, you can use a microwave. Heat the chocolate in the microwave for 45s and stir. If it's not melted, put the chocolate back into the microwave for 10s. Repeat this process until the chocolate is fully melted. Becareful not to overheat the chocolate as it gets burnt very easily.
2. Cool the chocolate mixture slightly.
3. Make one half of the Easter egg first, one at a time. Spoon the chocolate mixture into the mould until nearly full. Make sure that the sides are properly coated.
4. Drop in a hazelnut into the middle of the chocolate mould. Repeat for another half an egg.
5. When half of the chocolate mixture is used up, freeze the mould of eggs for about 10mins.
6. Remove the chocolate from its mould. It should be very easily removed when set, else freeze it for another few minutes.
7. Now, make the other half of the eggs. Spoon the chocolate mixture into the mould until nearly full. Make sure the sides are fully coated.
8. Place one of the readied egg on the chocolate mould. Press the readied egg so that some of the chocolate mixture in the mould would seal the two halves together.
9. Repeat this for all the eggs.
10. When ready, wrap each eggs in thin foil.

Tuesday, April 11, 2006

Chocolate Fondue


Last weekend, we had a pot luck dinner for my friend's birthday. I was in charge of the dessert and we have decided to go for chocolate fondue. Fondue originates from Switzerland, which refers to several communal dishes shared at the table in an earthernware port over a small burner. The term is French, 'fondre' meaning to melt. Contents in the eartern pot are kept in a liquid state so that food can be dipped into the sauce using the fondue fork. Besides chocolate, there are also cheese, oil and broth fondue.

For the fondue, I've prepared some fruits - grapes, bananas, apples and strawberries, and marshmallows. I've also made some choux pastry and viennese cookies to go with the chocolate. The choux pastry turned out well, though one of the batches was in the oven for too long...so it was a little bit burnt. I had a bit more problem with the viennese cookies. The dough was too thick for the cookie presser, so I had to shape each one of them myself.

Besides preparing for the fondue, I've also made some homemade chocolates. I've made this many many times before. Every friends of mine, and especially my boyfriend, loves this chocolate of mine. I've even packed this up as Christmas present last December. They've urged me many times before to consider selling this, but it'll not be that easy to find the right people to market to. I'll just have to wait and see if something come out of this!


I've found the choux pastry recipe from Delia's website.

Choux Pastry
Ingredients:
60g plain flour
50g butter, cut into small pieces
1 tsp caster sugar
2 large eggs, well beaten
150ml cold water

Methods:
1. Fold a sheet of baking parchment to make a crease, then open it up again. Sift the flour straight on to the square of parchment and add the sugar.
2. Put the cold water in a medium sized saucepan together with the pieces of butter, then place the saucepan over a moderate heat and stir with a wooden spoon. As soon as the butter has melted and the mixture comes up to the boil, turn off the heat immediately, as too much boiling will evaporate some of the water.
3. Tip in all the flour – in one go – with one hand, while you beat the mixture vigorously with the other. You can do this with a wooden spoon, although an electric whisk will save you lots of energy.
4. Beat until you have a smooth ball of paste that has left the sides of the saucepan clean – take less than a minute. Then beat in the beaten eggs – a little at a time, mixing in each addition thoroughly before adding the next – until you have a smooth glossy paste.
5. At this stage, hold the greased baking sheet under cold running water for a few seconds, and tap it sharply to get rid of excess moisture. This will help create a steamer atmosphere, which in turn helps the pastry to rise.
6. Pipe small choux pastry on the baking sheet, leaving 1 inch between them, and bake on a high shelf in the pre-heated oven gas mark 6, 400°F (200°C) for 10 mins. After that, increase the heat to Gas7/425F/220C and bake for a further 10-15mins until the choux buns are crisp, light and a rich golden colour.
7. Pierce the side of each one to let out the steam, then cool them on a wire rack.


Viennese Cookies
Ingredients:
125g butter
1/3 cup caster sugar
1 cup plain flour
1/4 cup cornflour

Methods:
1. Preheat the oven at 190C.
2. Cream the butter and sugar together until light and fluffy.
3. Sift in the flour and cornflour and stir until smooth.
4. Place the mixture in a cookie presser and press out the cookie dough on a well greased baking tray. *In my case, I just shape the cookies with my hand.
5. Bake for 10-15mins until pale gold.
6. Cool on a wire rack.

Friday, April 07, 2006

Vinegar Chicken and Grilled Salmon


Didn't have time to blog my weekday meals till now. Been busy with university's work and also been busy preparing for my friend's birthday this weekend. On Wednesday, I made vinegar chicken to eat with rice, and on Thursday, it was a grilled salmon dinner.


The original recipe is once again contributed by a member at Kitchen Capers. I've tweaked it slightly as I'm cooking a smaller portion.


Vinegar Chicken
Ingredients:
3 chicken thigh, deboned and cubed
1 onion, cut wedges
5 cloves garlic, minced
1 red chilli, sliced
Ginger, sliced
Chinese mushrooms, sliced
1 tbsp soy sauce
1/2 tbsp sugar
2 1/2tbsp Chinkiang vinegar
Cornflour
Olive oil

Methods:
1. Heat oil in the wok. Stir fry onion until soft. Add in garlic and ginger till fragrant.
2. Stir in mushrooms and chilli, stir fry for 1 minute.
3. Add in the chicken pieces until stir fry until it's almost done.
4. Add in the soy sauce, sugar and vinegar. Continue simmering till the chicken is cooked through.
5. Mix cornflour and water to the chicken to thicken the gravy. If you prefer to have more sauce, this step can be omitted.


This is a simple dinner that I usually cook whenever I managed to buy nice salmon.


Grilled Salmon Dinner
Ingredients:
1 salmon fillet
1 ball of pepper
Sea salt
Coarse ground black pepper
Dried rosemary
2 seafood sticks
Cucumber, to garnish
Olive oil

Methods:
1. Preheat the grill.
2. Line the baking tray with foil. Place peppers and salmon on the tray.
3. Drizzle olive oil all over. Grill until the salmon starts to brown.
4. Flip the salmon and peppers. Sprinkle sea salt, coarse ground black peppers and rosemary. Add the seafood sticks.
5. Continue grilling until the salmon browns.
6. Serve garnished with cucumbers.

Tuesday, April 04, 2006

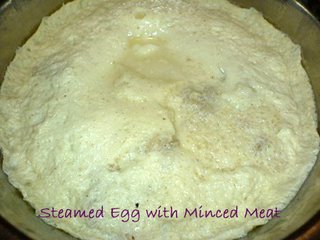
Prawns & Celery Stir Fry and Steamed Egg with Minced Meat

I don't usually cook a proper dinner meal during the weekday. As I usually eat alone, cooking a proper meal would mean eating it for a few days. But now that I start blogging, I'll try to cook more.
I've cooked Celery & Prawns Stir Fry and Steamed Egg with Minced Meat on Monday. The celery stir fry was nice, but I was a bit heavy-handed with the salt. This is the first time that I've tried steaming egg with minced meat. The egg is not smooth, and the minced meat sank to the bottom. The middle was also a little bit watery. It's not bad for a frist trial and error. Will try this again another time to better this.


Prawn & Celery Stir Fry
Ingredients:
6 stalks of celery
4 cloves of garlic
15 prawns
pinch of salt
oil, i used olive oil

Methods:
1. Season the prawns with a few drops of light soy sauce.
2. Slice the celery diagonally. Coarsely chopped the garlic.
3. Heat some oil in the wok. When the wok is hot, put in the garlic.
4. Put in the prawns and cook for 30s.
5. Add in the celery and stir fry for about 2-3mins. Season with some salt.
6. Serve.


Steamed Egg with Minced Meat
Ingredients:
100g minced pork
2 eggs
water
some tung choy
light soy sauce
white pepper

Methods:
1. Season the minced meat with some soy sauce.
2. Mix tung choy with the meat.
3. Beat 2 eggs with a dash of white pepper.
4. Mix the eggs to the meat and add in some water.
5. Steam in a steamer for about 20mins.
6. Serve.

Saturday, April 01, 2006

Tiramisu


A friend of mine is celebrating his birthday today. The tradition with my gang of friend in Nottingham is to have a pot luck dinner, where everyone is in charge of bringing a dish of food.
This tradition started since 2005, when we realised that eating out for dinner and getting a present is too expensive. As a result, the amount of money spent on present is usually compromised. So having potluck dinner sounds great....everyone except the birthday girl/boy will cook a dish, usually we'll plan before hand so that there won't be too many dishes of the same type.
This time however, the potluck party will be a week late as 2 people in the gang were not able to make it. The birthday boy doesn't mind it being belated....he'd rather have everyone around.
Having said that, I don't like the idea of him not having a cake for his birthday. So I decided to make him a Tiramisu cake and we actually celebrated his birthday yesterday with the rest of the gang that's around. He was surprised with this, as he thought that he'll only be getting his cake next week. :D
The feedback for this cake was really good. Everyone loves it, even my friend who doesn't have a sweet tooth. And because this recipe doesn't have coffee, it's suitable for anytime of the day...and especially those who don't or can't take caffeine at night. The amount of alcohol in the cake is just nice.


This recipe is contributed by Vi at Kitchen Capers. The recipe I've got here is halved of what she suggested.


Tiramisu
Ingredients:
28 sponge fingers
cocoa powder, for dusting

Syrup:
90ml water
90ml milk
60ml cocoa/chocolate liqueur - I used Baileys
25ml rum - I used Brandy
1/2 tsp vanilla essence
1 tbsp melted chocolate or chocolate syrup - I used the syrup

Cream:
225g mascarpone cheese, or any type of soft cheese
225g whipping cream
1 1/2 egg white*
100g castor sugar
1/2 tsp vanilla essence
15ml cocoa/chocolate liqueur - I used Baileys

Method:
1. Roast the sponge fingers in the oven at 160C for about 5mins.
2. First make the cream.
a) Beat egg whites and 1/3 of the sugar until sugar is dissolved and egg whites appear very frothy as a meringue. I beat mine until stiff peak.
b) Beat whipping cream nd 1/3 sugar until the sugar is dissolved. Don't overbeat this as the whipping cream can curdle is over beaten. I stopped beating when it achieved soft peak.
c) Beat the cream cheese with the remaining sugar, again until the sugar is dissolved. I find it easier to beat when the cheese is at room temperature. Beat the cheese first, and when it soften slightly, then only add the sugar.
d) Combine all the creams and add in vanilla and liqueur. Mix until all ingredients are incorporated.
3. Make the syrup by mixing all syrup ingredients together into a cup and warm the mixture in the microwave for 30s. The mixture just needs to be warmed.
4. Lastly, assemble the cake.
a) Place a layer of sponge fingers in the bottom of the baking pan. Sprinkle the sponge fingers with half the syrup liquid, making sure they are evenly spread across all areas.
b) Sieve cocoa powder all over the sponge fingers.
c) Spread 1/3 of the cream mixture on the cake. This might be a bit tricky as the cream sticks easily to the spoon and the cocoa powder. Make sure you spread the cream towards the sides of the pan and there's no holes with the sponge fingers below.
d) Layer the rest of the sponge fingers over the cream. Spinkle with the rest of the syrup and cover with cocoa powder.
e) Spread on the rest of the cream and level it well. Coat the top with plenty of cocoa. Refrigerate overnight.


* For those who doesn't fancy putting in egg white, you can omit this. Then, divide the sugar evenly between cream cheese and whipping cream.